HDX Sprayer Parts Manual: A Comprehensive Guide
This manual details HDX and HDX-Auto Utility Vehicle parts‚ like the Multi Pro WM Turf Sprayer Finishing Kit․ It covers parts for Solo Backpack Sprayers‚ offering diagrams for models 425‚ 473-D‚ 475‚ and more‚ ensuring detailed manual assistance․
HDX sprayers represent a versatile line of equipment utilized across diverse applications‚ from agricultural settings to professional landscaping and even household tasks․ These sprayers are known for their durability and relatively straightforward design‚ making them popular choices for both novice and experienced users․ Understanding the core components and operational principles of HDX sprayers is crucial for effective use and maintenance․
This guide serves as a comprehensive resource for HDX sprayer owners and technicians‚ focusing specifically on parts identification‚ troubleshooting‚ and repair procedures․ We will delve into the intricacies of various HDX models‚ highlighting key differences in their construction and functionality․ Proper maintenance‚ as outlined in this manual‚ will extend the lifespan of your sprayer and ensure optimal performance․ The information provided will empower you to confidently address common issues and maintain your equipment efficiently․
Understanding HDX Sprayer Models
HDX sprayers aren’t a single‚ monolithic design; rather‚ they encompass a range of models tailored to specific needs․ The Workman HDX and HDX-Auto Utility Vehicle‚ for example‚ often feature integrated spraying systems as part of a larger utility platform․ Conversely‚ Solo Backpack Sprayers (models 425‚ 473-D‚ 475‚ etc․) represent a more portable‚ manually operated solution․
Key distinctions between models lie in their tank capacity‚ pump type (manual vs․ powered)‚ nozzle configurations‚ and hose lengths․ Identifying your specific model is the first step in sourcing the correct parts․ Referencing the sprayer’s serial number and original documentation is highly recommended․ This manual aims to provide generalized guidance applicable to most HDX sprayers‚ but recognizing model-specific nuances is vital for accurate repairs and maintenance․ Detailed diagrams are essential for proper identification․
Common HDX Sprayer Applications
HDX sprayers serve diverse applications‚ ranging from agricultural and horticultural tasks to landscaping and general cleaning․ The Workman HDX utility vehicles‚ equipped with sprayer attachments like the Multi Pro WM Turf Sprayer Finishing Kit‚ are frequently used for broad-acre applications on golf courses‚ sports fields‚ and large properties․ These systems excel at efficient coverage over expansive areas․
Solo backpack sprayers‚ on the other hand‚ are ideal for targeted applications‚ such as pest control‚ herbicide application in gardens‚ and spot treatments․ Their portability makes them suitable for areas inaccessible to larger equipment․ Understanding the intended use of your HDX sprayer is crucial when selecting parts and performing maintenance․ This manual supports repairs across these varied applications‚ utilizing detailed diagrams for clarity․

HDX Sprayer Parts Breakdown
HDX sprayer parts encompass bodies‚ nozzles‚ pumps‚ hoses‚ and wands; detailed diagrams within this manual aid identification and efficient parts replacement․
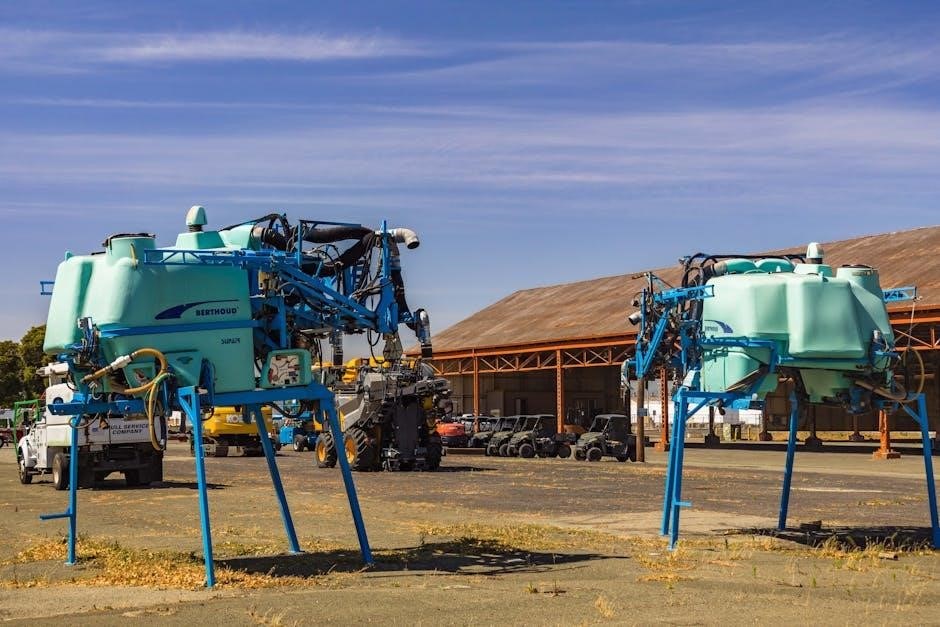
Sprayer Body Components
The sprayer body is the central housing for all operational components‚ typically constructed from durable polymers resistant to chemical exposure․ Key elements include the tank itself‚ available in various capacities to suit different application needs‚ and the tank lid‚ ensuring a secure‚ leak-proof seal during operation․
Inspect the tank for cracks or damage regularly․ The carry handle or harness attachment points are crucial for portability and should be checked for structural integrity․ Furthermore‚ the body often incorporates mounting points for the pump assembly and nozzle connections․ Understanding these components is vital for effective maintenance and repair‚ as outlined in detailed parts diagrams within this manual․
Proper body component function ensures safe and efficient spraying․
Nozzle Types and Selection
HDX sprayers utilize a variety of nozzle types‚ each designed for specific application requirements․ Adjustable cone nozzles provide a wide spray pattern‚ ideal for broad coverage‚ while flat fan nozzles deliver a concentrated‚ even distribution for targeted applications․ Deflector nozzles are useful for reaching difficult areas‚ and specialized nozzles exist for foaming or granular applications․
Nozzle selection depends on factors like the target surface‚ chemical being applied‚ and desired droplet size․ A finer mist is suitable for foliage‚ while a coarser spray is better for surfaces requiring thorough wetting․ Refer to the parts manual diagrams to identify compatible nozzles for your HDX model․ Regular inspection and replacement of worn or clogged nozzles are essential for maintaining optimal sprayer performance․
Pump Assembly and Functionality
HDX sprayer pump assemblies are the heart of the spraying system‚ responsible for generating the pressure needed for liquid dispersal․ These pumps typically consist of a piston‚ cylinder‚ and lever or trigger mechanism․ The pumping action creates a vacuum‚ drawing fluid from the tank and forcing it through the nozzle․
Functionality relies on maintaining seals and proper lubrication․ Parts manuals detail exploded views of the pump assembly‚ illustrating components like O-rings‚ diaphragms‚ and valves․ Regular inspection for wear and tear is crucial․ If experiencing low pressure‚ check for leaks around these seals․ Proper pump maintenance‚ including cleaning and occasional lubrication‚ extends the lifespan and ensures consistent performance of your HDX sprayer․
Hose and Wand Assemblies
HDX sprayer hose and wand assemblies are critical for directing the spray solution accurately․ These components connect the pump to the nozzle‚ enduring constant fluid pressure and potential physical stress․ Parts manuals illustrate various hose lengths‚ diameters‚ and connection types‚ alongside different wand designs – from simple straight wands to adjustable extension wands․
Inspection should focus on cracks‚ kinks‚ or leaks in the hose․ Wand assemblies may require nozzle replacement or cleaning․ Secure connections are vital to prevent pressure loss and ensure safe operation․ HDX often utilizes quick-connect fittings for easy assembly and disassembly․ Replacement parts are readily available‚ and diagrams within the manual aid in identifying the correct components for your specific HDX sprayer model․

Troubleshooting Common HDX Sprayer Issues

HDX sprayer manuals help diagnose low pressure‚ leaks‚ clogs‚ and pump failures‚ offering solutions for optimal performance and extended equipment lifespan․
Low Pressure Problems
Diagnosing low pressure in your HDX sprayer begins with a thorough inspection of the pump assembly․ Refer to your parts manual to identify the pump’s inlet and outlet filters‚ checking for obstructions․ A partially clogged filter significantly restricts flow‚ reducing pressure․
Next‚ examine the hose and wand assemblies for kinks‚ bends‚ or damage that could impede water delivery․ Ensure all connections are tight and secure․ If the pump appears functional‚ investigate the nozzle․ A worn or incorrect nozzle can also cause low pressure․
Consult the HDX sprayer parts manual for appropriate nozzle replacement options․ Finally‚ verify the sprayer tank isn’t experiencing a vacuum lock; ensure proper venting․
Leaking Sprayer Components
Identifying leaks in your HDX sprayer requires a systematic approach․ Begin by inspecting all connections within the hose and wand assemblies‚ ensuring they are securely fastened․ Refer to the HDX sprayer parts manual for proper tightening torque specifications․
Next‚ examine the sprayer body components‚ particularly around the tank seams and pump housing․ Look for visible cracks or deterioration․ A leaking pump assembly often indicates worn seals or O-rings; replacement parts are detailed in your manual․
Check the nozzle base for drips‚ which may necessitate nozzle replacement․ Always disconnect the sprayer from the power source (if applicable) before disassembly․ Consult parts diagrams to accurately identify and replace damaged components․
Clogged Nozzles and Filters
Clogging is a frequent issue with HDX sprayers‚ impacting performance․ Begin by inspecting the nozzle types for visible debris․ The HDX sprayer parts manual provides detailed instructions for nozzle removal and cleaning․ Use a fine wire or nozzle cleaning tool – avoid damaging the orifice․
If nozzle cleaning doesn’t resolve the issue‚ examine the sprayer’s internal filters․ These are typically located within the pump assembly or at the tank inlet․ Disassemble and rinse the filters thoroughly under clean water․
Refer to parts diagrams in your manual to locate all filter components․ Regular filter maintenance‚ as outlined in the manual‚ prevents future clogs and ensures optimal spray patterns․ Replacement filters are readily available from official HDX parts suppliers․
Pump Failure Diagnosis
Pump failure in an HDX sprayer often manifests as drastically reduced pressure or complete lack of spray․ Begin by checking the pump assembly for external damage‚ as detailed in the HDX sprayer parts manual․ Inspect the hose and wand assemblies for kinks or blockages that might mimic pump issues․
Disassemble the pump (refer to the manual’s exploded diagrams) and examine internal components like pistons and seals for wear or deterioration․ A worn seal is a common cause of pressure loss․
If the pump appears mechanically sound‚ test the pump’s functionality by manually actuating it․ If it feels stiff or doesn’t build pressure‚ replacement is likely necessary․ Official HDX parts suppliers offer complete pump assemblies and individual parts․

HDX Sprayer Maintenance and Repair
Regular cleaning‚ pump lubrication‚ and timely nozzle replacement—guided by the HDX sprayer parts manual—extend sprayer life and ensure optimal performance․
Regular Cleaning Procedures
Maintaining your HDX sprayer requires consistent cleaning to prevent clogging and ensure longevity․ After each use‚ thoroughly flush the tank with clean water‚ referencing your HDX sprayer parts manual for specific tank access points․ Disconnect the hose and wand assemblies and rinse them individually‚ paying close attention to the nozzle types․
Inspect the pump assembly for residue buildup; a gentle cleaning with a soft brush is recommended․ For stubborn deposits‚ a mild detergent solution can be used‚ but ensure complete rinsing afterward․ Regularly check and clean filters‚ as outlined in the manual‚ to maintain consistent spray pressure․ Proper cleaning‚ guided by the parts manual‚ prevents damage and optimizes performance․
Pump Maintenance and Lubrication
HDX sprayer pump assembly longevity depends on regular maintenance․ Consult your HDX sprayer parts manual for specific lubrication points; typically‚ these include piston seals and connecting rods․ Use a silicone-based lubricant‚ avoiding petroleum-based products that can degrade rubber components․
Periodically inspect the pump for wear and tear‚ referencing the parts diagrams in your manual․ Check for leaks around seals and connections․ If the pump exhibits reduced pressure‚ disassemble and clean internal components‚ relubricating during reassembly․ Proper lubrication‚ guided by the manual‚ minimizes friction‚ prevents corrosion‚ and ensures efficient operation of your HDX sprayer․
Nozzle Replacement Guide
HDX sprayer nozzle replacement is straightforward‚ but consult your HDX sprayer parts manual for model-specific instructions․ Begin by relieving pressure within the sprayer system․ Use a wrench to carefully loosen the nozzle retaining nut‚ avoiding damage to the threads․ Remove the old nozzle and inspect the nozzle seat for debris; clean if necessary․
Select a replacement nozzle from your parts supplier‚ matching the original specifications or desired spray pattern․ Apply Teflon tape to the nozzle threads for a secure seal․ Hand-tighten the new nozzle‚ then use a wrench to snug it further‚ avoiding over-tightening․ Refer to the manual’s diagrams to ensure correct installation and optimal performance of your HDX sprayer․
Hose and Wand Inspection & Repair
Regular inspection of your HDX sprayer’s hose and wand is crucial for safe and efficient operation․ Check the hose for cracks‚ kinks‚ or bulges along its entire length․ Examine the wand for bends or damage‚ particularly at connection points․ Refer to the HDX sprayer parts manual for detailed diagrams illustrating component locations․
For minor leaks‚ tighten hose connections․ If the hose is damaged‚ replace it entirely using a compatible part from an official supplier․ Inspect wand connections and replace O-rings if necessary․ Always relieve pressure before disconnecting any components․ Consult the manual for specific torque specifications․ Proper maintenance‚ guided by the manual‚ extends the life of your HDX sprayer․

Finding HDX Sprayer Parts
HDX sprayer parts are available through official suppliers and online retailers; utilize parts diagrams for accurate identification and compatibility checks․
Official HDX Parts Suppliers
Locating official HDX parts suppliers is crucial for ensuring genuine components and maintaining sprayer performance․ While specific‚ dedicated HDX parts suppliers aren’t prominently listed‚ sourcing often involves contacting manufacturers that utilize HDX components within their finished products․ For example‚ Workman utility vehicles‚ utilizing the HDX sprayer finishing kit (part number 07392)‚ would direct you to their authorized service networks․
These networks typically stock replacement parts or can directly order them․ Investigating the original equipment manufacturer (OEM) of your sprayer is a key step․ Checking with local agricultural equipment dealers‚ especially those servicing utility vehicles‚ can also yield results․ Remember to have your sprayer’s model number readily available when contacting suppliers to streamline the parts identification process and guarantee compatibility․
Online Retailers for HDX Parts

Finding HDX sprayer parts online requires a strategic approach‚ as a centralized HDX parts retailer isn’t readily available․ Broad online marketplaces like eBay and Amazon often host listings from various sellers offering components potentially compatible with HDX sprayers or related equipment like Workman utility vehicles․ Searching using specific part numbers (e․g․‚ 07392 for the Multi Pro WM Turf Sprayer Finishing Kit) is highly recommended․
Specialized agricultural parts websites may also carry relevant items․ However‚ verifying the seller’s reputation and the part’s authenticity is vital․ Cross-referencing part numbers with official diagrams and confirming compatibility before purchasing is essential to avoid incorrect or unsuitable replacements․ Always prioritize retailers with clear return policies and customer support․
Using Parts Diagrams for Identification
Accurate HDX sprayer part identification heavily relies on utilizing detailed parts diagrams․ These diagrams‚ often available through Solo’s documentation for compatible backpack sprayers (models 425‚ 473-D‚ 475‚ etc․)‚ visually break down the sprayer’s assembly‚ labeling each component with a unique part number․
When sourcing replacements‚ referencing these diagrams is crucial․ Locate the specific part needing replacement on the diagram and note its corresponding number․ This number serves as the key identifier when searching online retailers or contacting suppliers․ Diagrams ensure you order the correct component‚ preventing compatibility issues and wasted resources․ Always confirm the diagram matches your specific sprayer model for accuracy․
Interchangeable Parts and Compatibility
Determining HDX sprayer parts interchangeability requires careful consideration․ While some components‚ particularly those from Solo backpack sprayers (like those in models 425‚ 475‚ and 485)‚ may exhibit compatibility across similar models‚ it’s not universally guaranteed․
Specifically‚ components like nozzles‚ hoses‚ and certain pump parts might be interchangeable‚ but always verify using detailed parts diagrams and supplier information․ The HDX and HDX-Auto Utility Vehicle parts‚ such as the Multi Pro WM Turf Sprayer Finishing Kit‚ may have unique specifications․ Direct substitution isn’t always possible․ Prioritize using the exact part number specified in the manual to ensure proper fit and functionality‚ avoiding potential damage or performance issues․

Advanced HDX Sprayer Topics
UEFITool analysis‚ related to electronic components‚ aids BIOS updates; calibration‚ safety‚ and modification enhance HDX sprayer performance and longevity․
HDX Sprayer Calibration Techniques
Accurate calibration is crucial for effective and efficient spraying․ Begin by verifying all HDX sprayer parts are correctly installed and functioning‚ referencing the parts manual for proper assembly․ Measure the output volume over a timed period – typically one minute – using a calibrated container․ Compare this to the sprayer’s specified output rate․
Adjust the pressure regulator‚ if equipped‚ to achieve the desired flow rate․ Walk a measured distance at a consistent speed while operating the sprayer‚ collecting the spray from a series of containers․ Calculate the application rate (gallons per acre or liters per hectare) based on the collected volume and the area covered․ Repeat this process several times to ensure consistency․ Remember to account for nozzle type and spray pattern when calibrating․
Safety Precautions When Using HDX Sprayers
Prioritize safety when operating your HDX sprayer․ Always consult the parts manual to ensure all components are correctly installed and in good working order before use․ Wear appropriate personal protective equipment (PPE)‚ including eye protection‚ gloves‚ and a respirator if handling hazardous materials․
Never point the sprayer nozzle at people or animals․ Avoid spraying in windy conditions to prevent drift․ Thoroughly rinse the sprayer and all HDX sprayer parts after each use‚ following the cleaning procedures outlined in the manual․ Store chemicals in labeled containers‚ away from children and pets․ Be aware of the chemicals you are using and their specific hazards‚ referencing the Safety Data Sheet (SDS)․
Modifying and Upgrading HDX Sprayers
Modifying your HDX sprayer can enhance performance‚ but proceed with caution․ Refer to the parts manual for compatibility when considering upgrades․ Upgrading the nozzle‚ pump assembly‚ or hose can improve spray quality and efficiency․ Ensure any modifications adhere to safety standards and do not compromise the sprayer’s integrity․
When replacing HDX sprayer parts‚ prioritize quality components from official suppliers or reputable retailers․ Incorrectly installed or incompatible parts can lead to malfunctions or safety hazards․ Document all modifications for future reference and maintenance․ Consider professional assistance if you are unsure about any aspect of the upgrade process․ Always test the sprayer thoroughly after any modification․
Understanding UEFITool and BIOS Updates (Related to potential electronic components in advanced models)
Advanced HDX sprayer models‚ incorporating electronic controls‚ may utilize a BIOS or firmware system; UEFITool is a software suite used to read‚ patch‚ and potentially flash these firmware images․ This is relevant when addressing issues like overclocking locks or configuration settings․ Extracting the UEFI binaries allows for disassembly and analysis of the system’s programming․
However‚ modifying the BIOS is a complex process and carries risks․ Incorrect flashing can render the electronic components unusable․ Always download firmware directly from the manufacturer and exercise extreme caution․ This information is primarily applicable to models with sophisticated electronic features‚ and is generally not relevant to standard HDX sprayer parts or maintenance․
Related Posts

troy bilt 2700 psi pressure washer operator’s manual
The Troy-Bilt 2700 PSI pressure washer’s operator’s manual details safe…

jacuzzi manual
Jacuzzi Manual: A Comprehensive Guide This guide offers detailed troubleshooting,…

myq-g0401-es manual
Chamberlain MYQ-G0401-ES Manual: A Comprehensive Guide This guide provides detailed…